In the previous blog post of this series, I talked about CodeQL, a static analyzer from GitHub that performs semantic search queries on source code to extract structured data. I described how I wrote my first CodeQL query and how I executed it locally. In this second blog post, I want to go beyond that.
I will cover aspects that are required for putting custom queries into production. I’ll explain:
- how CodeQL sources are organized,
- what query metadata is,
- how to run CodeQL in GitHub Actions, and
- how to visualize results.
While the first two topics are specific to teams that need to write their own queries, the last two are applicable both to teams that write their own queries and to teams relying on the default queries shipped with CodeQL (which do capture a vast number of issues already).
I won’t dive deep on any topic, but rather give an overview of the features you will most likely need to put your own CodeQL queries into production. I’ll often link to GitHub’s official documentation, so that you have quick access to the documentation most useful to you. Finding what you need can be a bit of a challenge, because CodeQL’s documentation is spread over both https://docs.github.com/en/code-security and https://codeql.github.com/docs/.
Structure of CodeQL sources
There are four main types of CodeQL file:
-
*.qlfiles are query files. A query is an executable request and a query file must contain exactly one query. I will describe the query syntax below. A query file cannot be imported by other files. -
*.qllfiles are library files. A library file can contain types and predicates, but it cannot contain a query. Library files can be imported. -
*.qlsfiles are YAML files describing query suites. They are used to select queries, based on various filters such as a query’s filename, name, or metadata. Query suites are documented in detail in the official documentation. -
*.qlpackfiles are YAML files describing packs. Packs are containers for the three previous kind of files. A pack can either be a query pack, containing queries to be run; a library pack, containing code to be reused; or a model pack, which is an experimental kind of pack meant to extend existing CodeQL rules. Packs are described in detail here.When developing custom queries, I need to wrap them in a query pack in order to declare on what parts of the CodeQL standard library my queries depend (here’s an example to show how to depend on the Java standard library).
Queries in *.ql files have the following structure (as explained in more detail in the official documentation):
from /* ... variable declarations ... */
where /* ... logical formula ... */
select /* ... expressions ... */
This can be understood like an SQL query:
- First, the
fromclause declares typed variables that can be referenced in the rest of the query. Because types define predicates, this clause already constrains the possible instances returned by thewhereclause that follows. - The
whereclause constrains the query to only return the variables that satisfy the logical formula it contains. It can be omitted, in which case all instances of variables with the type specified in thefromclause are returned. - The
selectclause limits the query to operate on the variables declared in thefromclause. Theselectclause can also contain formatting instructions, so that the results of the query are more human readable.
To give an example of a query, if I need to write a query to track
tainted data in Java, in a file named App.java, I’ll write this to start somewhere
and will refine the where clause iteratively, based on the query’s result:
from DataFlow::Node node // A node in the syntax tree
where node.getLocation().getFile().toString() = "App"  // .java extension is stripped
select node, "node in App"
select clauses must obey the following constraints with respect to the number of columns selected:
- A problem query (see below) must select an even number of columns.
The format is supposed to be:
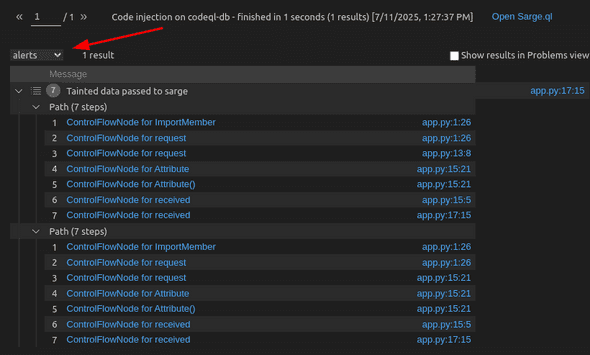
select var1, formatting_for_var1, var2, formatting_for_var2, ...whereformatting_for_var*must be an expression returning a string, as described earlier in theselectparagraph. If you omit the formatting, the query is executed, but a warning is issued. - A path-problem query must select four columns, the first three referring to syntax nodes and the fourth
one a string describing the issue. This assumption is required by the
CodeQL Query Resultsview in VSCode to show the results as paths (using the alerts style in the drop down):
Query metadata
The header of a query defines a set of properties called query metadata:
/**
 * @name Code injection
 * @description Interpreting unsanitized user input as code allows a malicious user to perform arbitrary
 *              code execution.
 * @kind path-problem
 * @problem.severity error
 * ...
 */
Query metadata is documented in detail in CodeQL’s official documentation. I don’t want to repeat GitHub’s documentation here, so I’m focusing on the important information:
@kindcan take two values:problemandpath-problem. The former is for queries that flag one specific location, while the latter is for queries that track tainted data flow from a source to a sink.- Severity of issues is defined through two means, depending on whether the query is considered a security-related
one or not 🤷
@problem.severityis used for queries that don’t have@tags security.@problem.severitycan be one oferror,warning, orrecommendation.@security-severityis a score between0.0and10.0, for queries with@tags security.
Metadata is most useful for filtering queries in qls files.
This is used extensively in queries shipped with CodeQL itself, as visible for example in
security-experimental-selectors.yml1. To give an idea of the filtering capability, here is an excerpt of this file that declares filtering criteria:
- include:
    kind:
      - problem
      - path-problem
    precision:
      - high
      - very-high
    tags contain:
      - security
- exclude:
    query path:
      - Metrics/Summaries/FrameworkCoverage.ql
      - /Diagnostics/Internal/.*/
- exclude:
    tags contain:
      - modeleditor
      - modelgenerator
To smooth the introduction of CodeQL (and security tools in general), I recommend starting small and only reporting the most critical alerts at first (in other words: filtering aggressively). This helps to convince teammates that CodeQL reports useful insights, and it doesn’t make the task of fixing security vulnerabilities look insurmountable.
Once the most critical alerts are fixed, I advise loosening the filtering, so that pressing — but not critical — issues can be addressed.
Running CodeQL in GitHub Actions
The following GitHub Actions are required to run CodeQL:
github/codeql-action/initinstalls CodeQL and creates the database. It can be customized to specify the list of programming languages to analyze, as well as many other options. Customization is done in the YAML workflow file, or via an external YAML configuration file, as explained in the customize advanced setup documentation.github/codeql-action/autobuildis required if you are analyzing a compiled language (such as C# or Java, as opposed to Python). This action can either work out of the box, guessing what to do based on the presence of the build files that are idiomatic in your programming language’s ecosystem. I must admit this is not very principled — you need to look up the corresponding documentation to see how CodeQL is going to behave for your programming language and platform. If the automatic behavior doesn’t work out of the box, you can manually specify the build commands to perform.github/codeql-action/analyzeruns the queries. Its results are used to populate the Security tab, as shown below.
Since the actions work out of the box on GitHub, replicating them in another CI/CD system is non-trivial: you will have to build your own solution.
Visualizing results
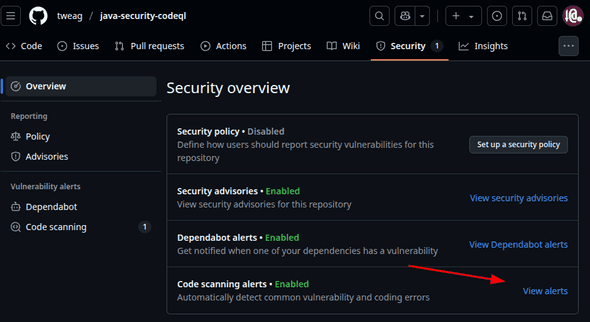
Once CodeQL executes successfully in CI, GitHub’s UI picks up its results automatically and shows them in the Security tab:
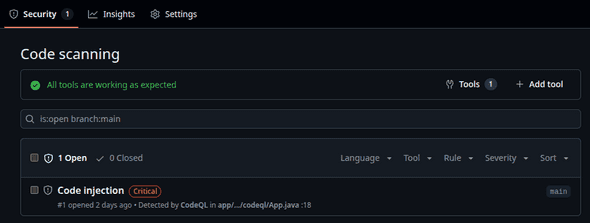
You may wonder why you cannot see the Security tab on the repository used to create this post’s screenshots yourself. This is because, as GitHub’s documentation explains, security alerts are only visible to people with the necessary rights to the repository. The required rights depend on whether the repository is owned by a user or an organisation. In any case, security alerts cannot be made visible to people who do not have at least some rights to the relevant repository. Clicking on View alerts brings up the main CodeQL view:
As visible in the screenshot, this view allows you to filter the alerts in multiple ways, as well as to select the branch from which the alerts are shown.
Conclusion
In this post, I covered multiple aspects that you need to know to put your custom queries in production. I described how CodeQL codebases are organized and the constraints that individual queries must obey. I described queries’ metadata and how metadata is used. I concluded by showing how to run queries in CI and how everyone in a team can visualize the alerts found. Equipped with this knowledge, I think you are ready to experiment with CodeQL and later pitch it to your stakeholders, as part of your security posture 😉
Behind the scenes
Clément is a Director of Engineering, leading the Build Systems department. He studied Computer Science at Telecom Nancy and received his PhD from Université Nice Sophia Antipolis, where he proved multithreaded programs using linear logic. His technical background includes functional programming, compilers, provers, distributed systems, and build systems.
If you enjoyed this article, you might be interested in joining the Tweag team.


