

Feature flags reduce deployment risk, enable continuous delivery, and create controlled user experiences. As a Svelte enthusiast, I noticed the absence of official LaunchDarkly support for this growing framework, so I built the LaunchDarkly Svelte SDK to fill this gap. In this post, I’ll introduce the SDK and demonstrate how to implement it in a SvelteKit application.
Feature Flags in Frontend Development
Feature flags (or feature toggles) are runtime-controlled switches that let you enable or disable features without unnecessary deployments.
For example, imagine you are working on a new feature that requires significant changes to the UI. By using feature flags, you can deploy the changes to all the environments but only enable the feature in specific ones (like development or uat), or to a subset of users in a single environment (like users on Pro subscription). This allows you to test the feature without exposing it to unintended users, reducing the risk of introducing bugs or breaking changes. And in case things go bad, like a feature is not working as expected, you can easily disable it without having to roll back the entire deployment.
What is LaunchDarkly ?
LaunchDarkly is a feature management platform that provides an easy and scalable way to wrap parts of your code (new features, UI elements, backend changes) in flags so they can be turned on/off without redeploying. It provides a user-friendly dashboard to manage and observe flags, and supports over a dozen SDKs for client/server platforms. In my experience, LaunchDarkly is easier to use — including for non-technical users — and more scalable than most home-grown feature flag solutions.
LaunchDarkly supports targeting and segmentation, so you can control which users see specific features based on things like a user’s location or subscription plan. It also offers solid tooling for running experiments, including A/B testing and progressive rollouts (where a new feature is released to users in stages, rather than all at once). All feature flags can be updated in real-time, meaning that there’s no need for users to refresh the page to see changes.
Those are just my favorites, but if you are interested in learning more about it, LaunchDarkly has a blog post with more information.
Flag Evaluations
LaunchDarkly flags have unique identifiers called flag keys that are defined in the LaunchDarkly dashboard. When you request a flag value, supported client-side SDKs (such as React, iOS, Android, or, now, Svelte) send the flag key along with user information (called the “context”) to LaunchDarkly. LaunchDarkly’s server computes the value of the flag using all the applicable rules (the rules are applied in order) and sends the result back to the app. This process is called flag evaluation. By default, LaunchDarkly uses streaming connections to update flags in real time. This lets you flip flags in the dashboard and see the effect almost instantly in your app.
Svelte in Brief
Svelte is a modern JavaScript framework that I’ve come to appreciate for its performance, simplicity, and excellent developer experience. What I particularly like about Svelte is that it lets you write reactive code directly using standard JavaScript variables, with an intuitive syntax that requires less boilerplate than traditional React or Vue applications. Reactive declarations and stores are built into the framework, so you don’t need Redux or similar external state management libraries for most use cases.
Svelte’s Approach
- Superior Runtime Performance: Svelte doesn’t rely on virtual DOM. By eliminating the virtual DOM and directly manipulating the real DOM, Svelte can update the UI more quickly and efficiently, resulting in a more responsive application.
- Faster Load Times: Svelte’s compilation process generates smaller JavaScript bundles and more efficient code, resulting in faster initial page load times compared to frameworks that ship runtime libraries to the browser.
A Simple Example of a Svelte Component
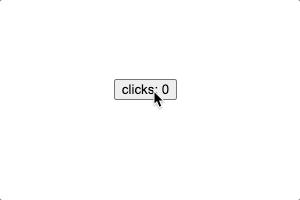
In this example, we define a SimpleCounter component that increments a count when a button is clicked. The count variable is reactive, meaning that any changes to it will automatically update the UI.
// SimpleCounter.svelte
<script lang="ts">
  let count = $state(0);
</script>

<button onclick={() => count++}>
  clicks: {count}
</button>
Now, we can use this component in our application which is in fact another Svelte component. For example: App.svelte:
// App.svelte
<script lang="ts">
  import SimpleCounter from './SimpleCounter.svelte';
</script>

<SimpleCounter />
After doing this, we can end up with something like this:
Overview of the LaunchDarkly Svelte SDK
Why Use a Dedicated Svelte SDK?
Although LaunchDarkly’s vanilla JavaScript SDK could be used in a Svelte application, this new SDK aligns better with Svelte’s reactivity model and integrates with Svelte-tailored components, allowing us to use LaunchDarkly’s features more idiomatically in our Svelte projects. I originally developed it as a standalone project and then contributed it upstream to be an official part of the LaunchDarkly SDK.
Introduction to LaunchDarkly Svelte SDK
Here are some basic steps to get started with the LaunchDarkly Svelte SDK:
1.Install the Package: First, install the SDK package in your project.
Note: Since the official LaunchDarkly Svelte SDK has not been released yet, for the purposes of this blog post, I’ve created a temporary package available on npm that contains the same code as the official repo. You can still check the official source code in LaunchDarkly’s official repository.
npm install @nosnibor89/svelte-client-sdk2.Initialize the SDK: Next, you need to initialize the SDK with your LaunchDarkly client-side ID (you need a LaunchDarkly account). This is done using the LDProvider component, which provides the necessary context for feature flag evaluation. Here is an example of how to set it up:
<script lang="ts">
  import { LDProvider } from '@nosnibor89/svelte-client-sdk';
  import MyLayout from './MyLayout.svelte';
</script>

// Use context relevant to your application. More info in https://docs.launchdarkly.com/home/observability/contexts
const context = {
  user: {
    key: 'user-key',
  },
};

<LDProvider clientID="your-client-side-id" {context}>
  <MyLayout />
</LDProvider>
Let’s clarify the code above:
- Notice how I wrapped the
MyLayoutcomponent with theLDProvidercomponent. Usually, you will wrap a high-level component that encompasses most of your application withLDProvider, although it’s up to you and how you want to structure the app. - You can also notice two parameters provided to our
LDProvider. The"your-client-side-id"refers to the LaunchDarkly Client ID and thecontextobject refers to the LaunchDarkly Context used to evaluate feature flags. This is necessary information we need to provide for the SDK to work correctly.
3.Evaluate a flag: The SDK provides the LDFlag component for evaluating your flag1. This component covers a common use case where you want to render different content based on the state of a feature flag. By default, LDFlag takes a boolean flag but can be extended to work with the other LaunchDarkly flag types as well.
<script lang="ts">
 import { LDFlag } from '@nosnibor89/svelte-client-sdk';
</script>

<LDFlag flag={'my-feature-flag'}>
  {#snippet on()}
    <p>renders if flag evaluates to true</p>
  {/snippet}
  {#snippet off()}
    <p>renders if flag evaluates to false</p>
  {/snippet}
</LDFlag>
In this example, the LDFlag component will render the content inside the on snippet2 if the feature flag my-feature-flag evaluates to true. If the flag evaluates to false, the content inside the off snippet will be rendered instead.
Building an application with SvelteKit
Now that we have seen the basics of how to use the LaunchDarkly Svelte SDK, let’s see how we can put everything together in a real application.
For the sake of brevity, I’ll be providing the key source code in this example, but if you are curious or need help, you can check out the full source code in Github.
How the app works
This is a simple ‘movies’ app where the main page displays a list of movies in a card format with a SearchBar component at the top. This search bar allows users to filter movies based on the text entered.
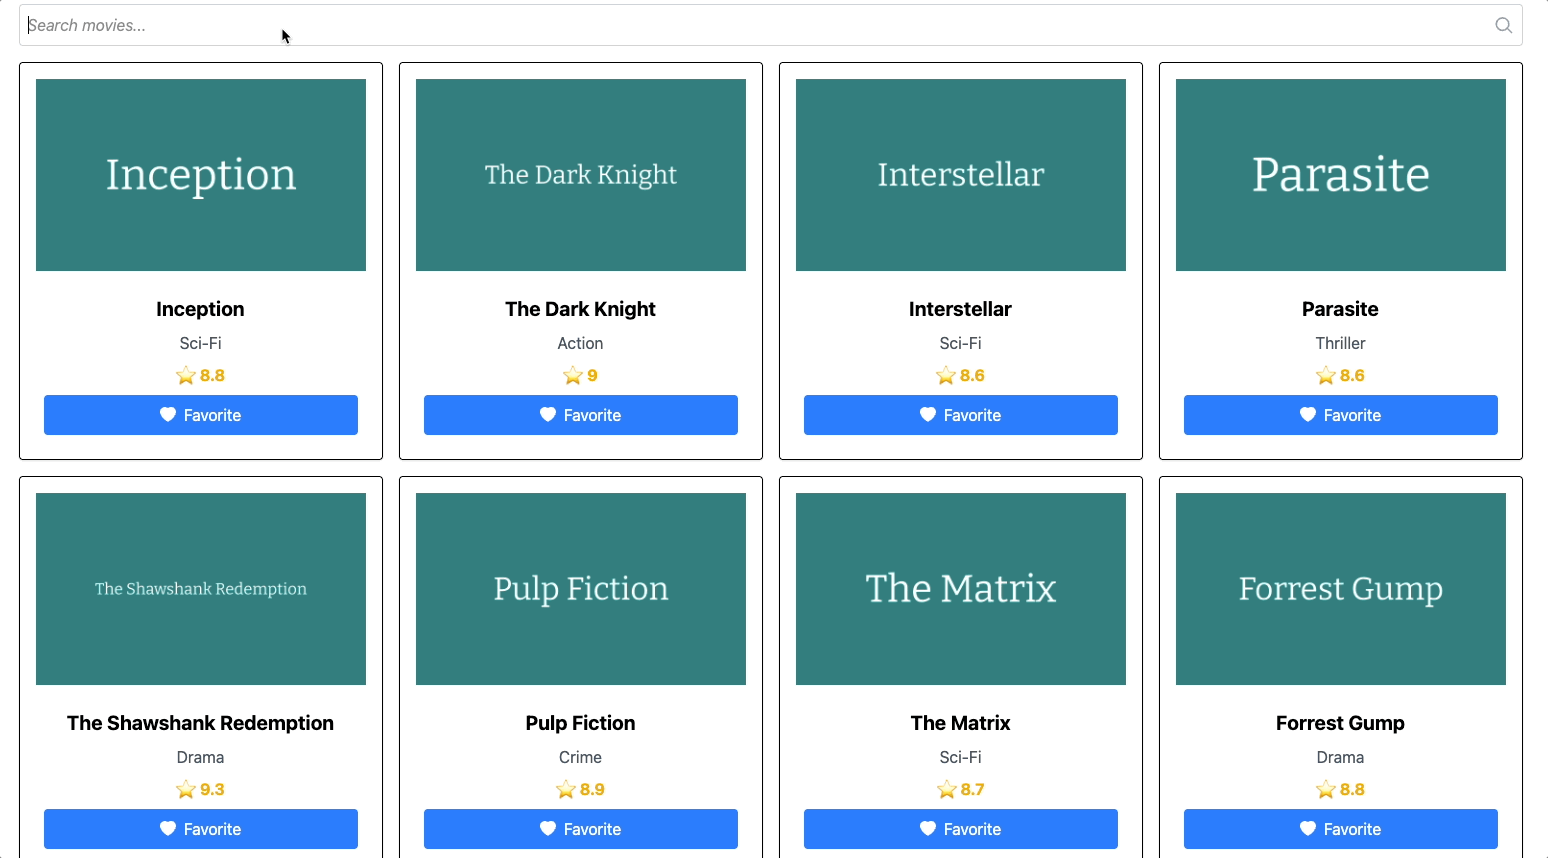
The scenario we’re simulating is that Product Owners want to replace the traditional search bar with a new AI-powered assistant that helps users get information about specific movies. This creates a perfect use case for feature flags and can be described as follows:
Feature Flag Scenarios
-
SearchBar vs AI Assistant: We’ll use a boolean feature flag to determine whether to display the classic
SearchBarcomponent or the newMoviesSmartAssistant3 component - simulating a simple all-at-once release. -
AI Model Selection: We’ll use a JSON feature flag to determine which AI model (GPT or Gemini) the
MoviesSmartAssistantwill use. This includes details about which model to use for specific users, along with display information like labels. This simulates a progressive rollout where Product Owners can gather insights on which model performs better.
Prerequisites
To follow along, you’ll need:
- A LaunchDarkly account
- A LaunchDarkly Client ID (Check this guide to get it)
- Two feature flags (see the creating new flags guide): a boolean flag (
show-movie-smart-assistant) and a JSON flag (smart-assistant-config) looking like this:{ "model": "gpt-4", "label": "Ask GPT-4 anything" } - A SvelteKit4 application (create with
npx sv create my-app)
Integrating the LaunchDarkly Svelte SDK
After creating the project, a SvelteKit application was scaffolded for you, meaning you should have a src directory where your application code resides. Inside this folder, you will find a routes directory, which is where SvelteKit handles routing. More specifically, there are two files: +layout.svelte and +page.svelte which are the main files we are going to highlight in this post.
Setting up the layout
// src/routes/+layout.svelte
<script lang="ts">
  import "../app.css";
  import { LDProvider } from "@nosnibor89/svelte-client-sdk";
  import { PUBLIC_LD_CLIENT_ID } from '$env/static/public';
  import LoadingSpinner from "$lib/LoadingSpinner.svelte"; // Check source code in Github https://github.com/tweag/blog-resources/blob/master/launchdarkly-svelte-sdk-intro/src/lib/LoadingSpinner.svelte

  let { children } = $props();

  // random between 0 and 1
  const orgId = Math.round(Math.random());

  const orgKey = `sdk-example-org-${orgId}`


  const ldContext = {
    kind: "org",
    key: orgKey,
  };

</script>

<LDProvider clientID={PUBLIC_LD_CLIENT_ID} context={ldContext}>
  {#snippet initializing()}
    <div class="...">
      <LoadingSpinner message={"Loading flags"}/>
    </div>
  {/snippet}

  {@render children()}
</LDProvider>
Let’s analyze this:
- We are importing the
LDProvidercomponent from the LaunchDarkly Svelte SDK and wrapping our layout with it. In SvelteKit, the layout will act as the entry point for our application, so it’s a good place for us to initialize the SDK allowing us to use other members of the SDK in pages or child components. - We are also importing the
PUBLIC_LD_CLIENT_IDvariable from the environment variables. You can set this variable in your.envfile at the root of the project (this is a SvelteKit feature). - Another thing to notice is that we are using a
LoadingSpinnercomponent while the SDK is initializing. This is optional and is a good place to provide feedback to the user while the SDK is loading and feature flags are being evaluated for the first time. Also, don’t worry about the code forLoadingSpinner, you can find it in the source code on Github.
Add the movies page
At this point, we are ready to start evaluating flags, so let’s now go ahead and add our page where the SDK will help us accomplish scenarios 1 and 2.
Movies Page (SearchBar vs AI Assistant)
The movies page is the main and only page of our application. It displays a list of movies along with a search bar. This is the part where we will evaluate our first feature flag to switch between the SearchBar and the MoviesSmartAssistant components.
// src/routes/+page.svelte
<script lang="ts">
  // ...some imports hidden for brevity. Check source code on Github
  import SearchBar from "$lib/SearchBar.svelte";
  import MoviesSmartAssistant from "$lib/MoviesSmartAssistant.svelte";
  import { LD, LDFlag } from "@nosnibor89/svelte-client-sdk";

  let searchQuery = $state("");
  let prompt = $state("");
  const flagKey = "show-movie-smart-assistant";
  const flagValue = LD.watch(flagKey);
  flagValue.subscribe((value) => {
    // remove search query or prompt when flag changes
      searchQuery = "";
      prompt = "";
  });

  // ...rest of the code hidden for brevity. Check source code on Github
  // https://github.com/tweag/blog-resources/blob/master/launchdarkly-svelte-sdk-intro/src/routes/%2Bpage.svelte

</script>

<div class="...">
  <LDFlag flag={flagKey}>
    {#snippet on()}
      <MoviesSmartAssistant
        prompt={prompt}
        onChange={handlePromptChange}
        onSubmit={handleSendPrompt}
      />
    {/snippet}
    {#snippet off()}
      <SearchBar value={searchQuery} onSearch={handleSearch} />
    {/snippet}
  </LDFlag>

  <div
    class="..."
  >
    {#each filteredMovies as movie}
      <MovieCard {movie} />
    {/each}
  </div>
</div>
Again, let’s break this down:
- We are using the
LDFlagcomponent from the SDK. It will allow us to determine which component to render based on the state of theshow-movie-smart-assistantfeature flag. When the flag evaluates totrue, theonsnippet will run, meaning theMoviesSmartAssistantcomponent will be rendered, and when the flag evaluates tofalse, theoffsnippet will run, meaning theSearchBarcomponent will be rendered. - We are also using the
LD.watchfunction. This is useful when you need to get the state of a flag and keep track of it. In this case, we are simply resetting the search query or prompt so that the user can start fresh when the flag changes. - The rest of the code you are not seeing is just functionality for the filtering mechanism and the rest of the presentational components. Remember you can find the code for those on Github.
MoviesSmartAssistant Component (AI Model Selection)
Whenever our MoviesSmartAssistant component is rendered, we want to check the value of the smart-assistant-config feature flag to determine which AI model to use for the assistant.
// src/lib/MoviesSmartAssistant.svelte
<script lang="ts">
  import { LD } from "@nosnibor89/svelte-client-sdk";
  import type { Readable } from "svelte/store";

  type MoviesSmartAssistantConfig = { model: string; label: string;};
  const smartAssistantConfig = LD.watch("smart-assistant-config") as Readable<MoviesSmartAssistantConfig>;
  // ... rest of the code hidden for brevity. Check source code on Github
  // https://github.com/tweag/blog-resources/blob/master/launchdarkly-svelte-sdk-intro/src/lib/MoviesSmartAssistant.svelte
</script>

<div class="...">
  <input
    type="text"
    placeholder={$smartAssistantConfig?.label ?? "Ask me anything..."}
    value={prompt}
    oninput={handleInput}
    class="..."
  />
  <button type="button" onclick={handleClick} aria-label="Submit">
    // ...svg code hidden for brevity
  </button>
</div>
As before, I’m hiding some code for brevity, but here are the key points:
- We are using the
LD.watchmethod to watch for changes in thesmart-assistant-configfeature flag which contains information about the AI model. This will allow us to use the proper model for a given user based on the flag evaluation. - Notice how the SDK understands it’s a JSON flag and returns a Javascript object (with a little help5) as we defined in the LaunchDarkly dashboard.
Running the Application
Now that we have everything set up, let’s run the application. Here we are going to use the Client ID and set it as an environment variable.
PUBLIC_LD_CLIENT_ID={your_client_id} npm run devOpen your browser and navigate to http://localhost:5173 (check your terminal as it may run at a different port). You should see the movies application with either the SearchBar or MoviesSmartAssistant component depending on your feature flag configuration.
Seeing Feature Flags in Action
If you were able to correctly set everything up, you should be able to interact with the application and LaunchDarkly Dashboard by toggling the feature flags and validating the behavior of the application.
I have included this demo video to show you how the application works and how the feature flags are being evaluated.
Conclusion
We just saw how to use the LaunchDarkly Svelte SDK and integrate it into a SvelteKit application using a realistic example. I hope this post gave you an understanding of the features the SDK provides and also what it lacks while being in its early stages and while awaiting the official release.
For now, my invitation for you is to try the SDK yourself and explore different use cases. For example, change the context with LD.identify to simulate users signing in to an application, or maybe try a different flag type like a string or number flag. Also, stay tuned for updates on the official LaunchDarkly Svelte SDK release.
LDFlagis a key component but there are other ways to evaluate a flag using the SDK.↩- Snippets are a Svelte feature and can also be named slots. Check out https://svelte.dev/docs/svelte/snippet↩
- The
MoviesSmartAssistantcomponent is just a visual representation without actual AI functionality — my focus is on demonstrating how the LaunchDarkly Svelte SDK enables these feature flag implementations.↩ - SvelteKit is the official application framework for Svelte. It comes with out-of-the-box support for TypeScript, server-side rendering, and automatic routing through file-based organization.↩
- Ok, I’m also using TypeScript here to hint the type of the object returned by the
LD.watchmethod. Maybe this is something to fix in the future.↩
Behind the scenes
Robinson is a principal fullstack developer that has been involved in the construction of digital products for health, educational and logistics sectors among others. He has experience building decoupled systems using microservices, containerized and serverless applications on both On-Premise and Cloud platforms. He is loyal follower of best practices, unit testing, and teamwork.
If you enjoyed this article, you might be interested in joining the Tweag team.


